
This article is for clients and it explains how the Zapier Integration works.
The Zapier integration allows Deel clients without technical coding skills to sync data with a 'no-code' option.
Deel wants to make it easier for non-technical clients to automate processes using Deel API by enabling them to access no-code tools.
Using Zapier, clients can build automation flows with Deel without a background in computer coding.
In this article:
How to create a customized Zap between Deel and external software
Creating API access tokens on Deel
Creating a customized Zap between Deel and your external software
✅ Step 1 - Choose app and event
Select Deel as the trigger app and choose the event that should start your Zap.
If data needs to flow into Deel, select the external software as the trigger instead.
✅ Step 2 - Choose account
Select Sign in to Deel and paste an API access token.
Create API access tokens by following the steps in Creating API access tokens.
Creating API access tokens
If an access token was not created in Deel's Developer Center, please follow the steps in API guide
API access tokens are required to connect Deel to Zapier and other integrations.
Step 1 - Expand Apps & Automation
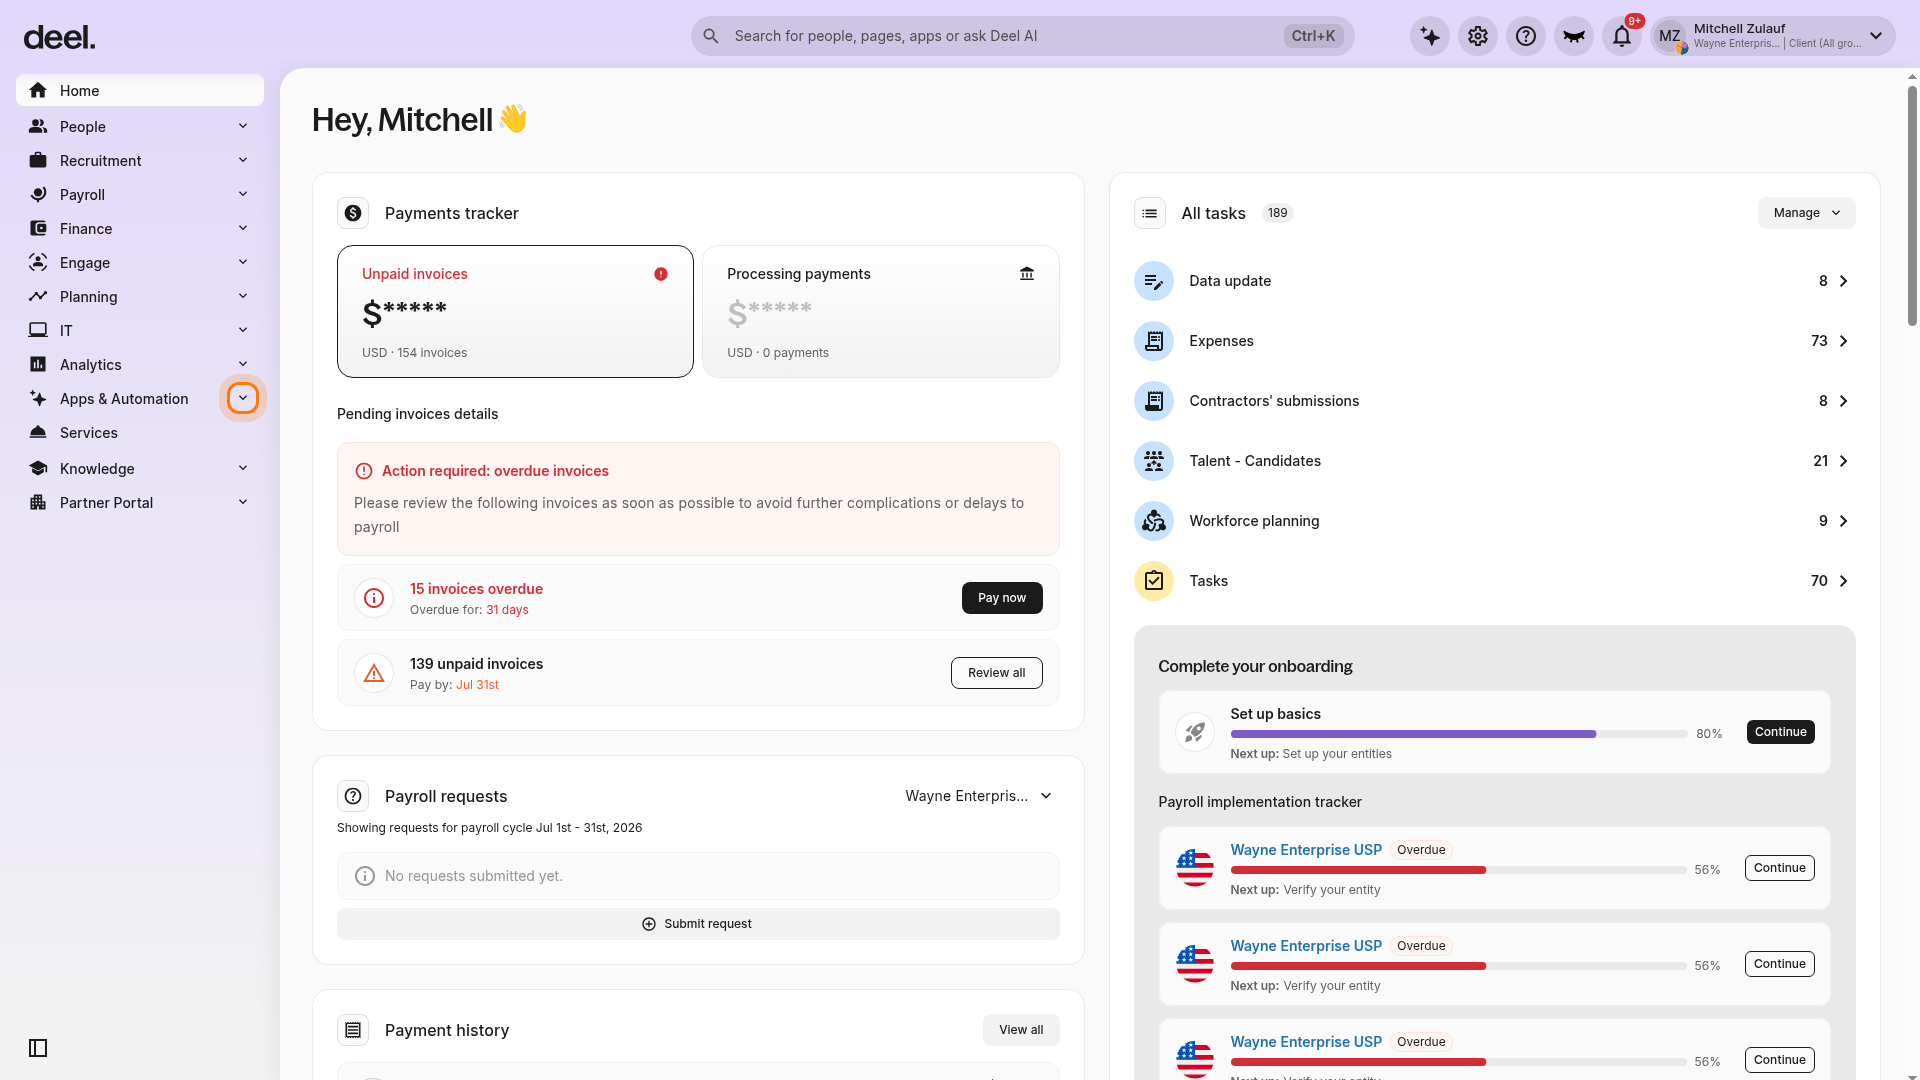
From the Deel Home dashboard, select Apps & Automation in the left sidebar to expand its submenu.
Options including App Store appear below Apps & Automation.
Step 2 - Open App Store
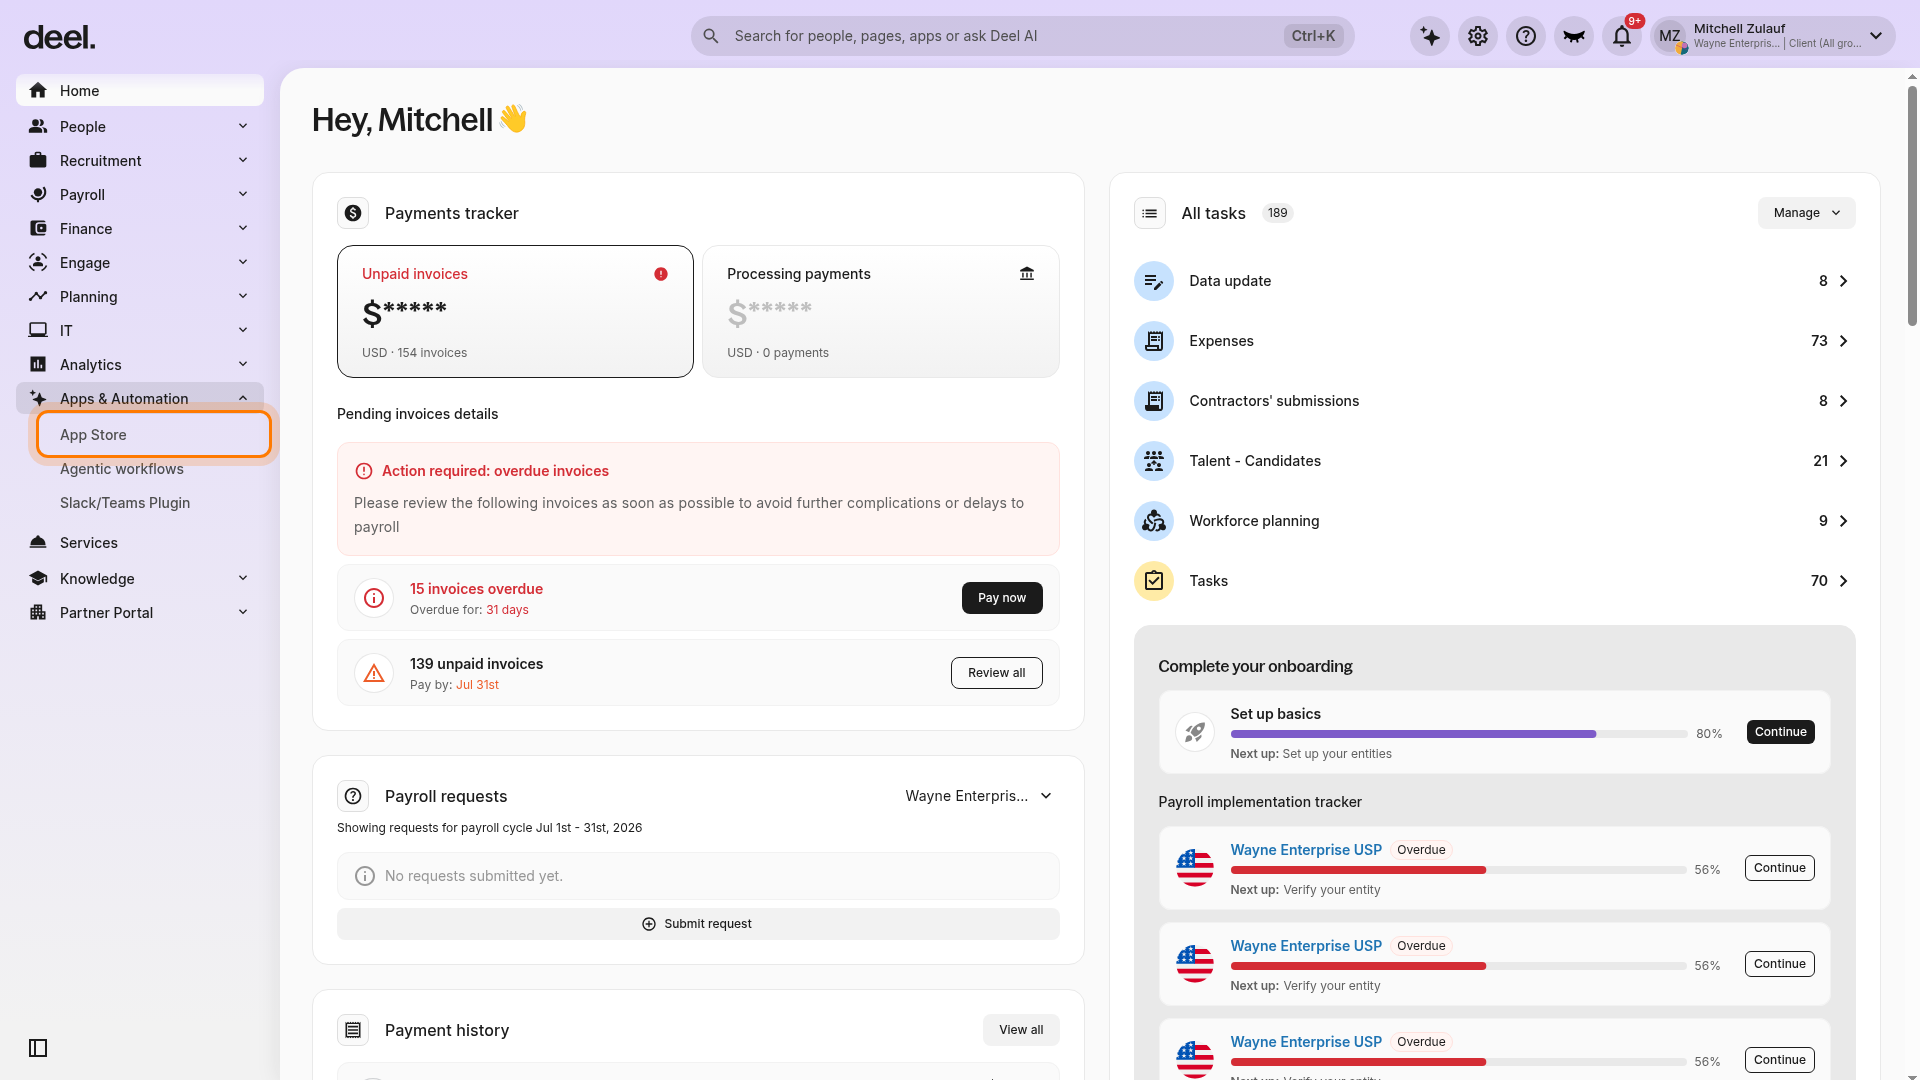
Select App Store from the expanded Apps & Automation submenu.
The Apps overview page begins loading.
Step 3 - Close the optional welcome pop-up
If the Welcome to your Deel Apps & Integrations pop-up appears, close it using the X in its upper-right corner.
The pop-up can block the App Store controls but does not affect token generation.
Step 4 - Open Developer Center
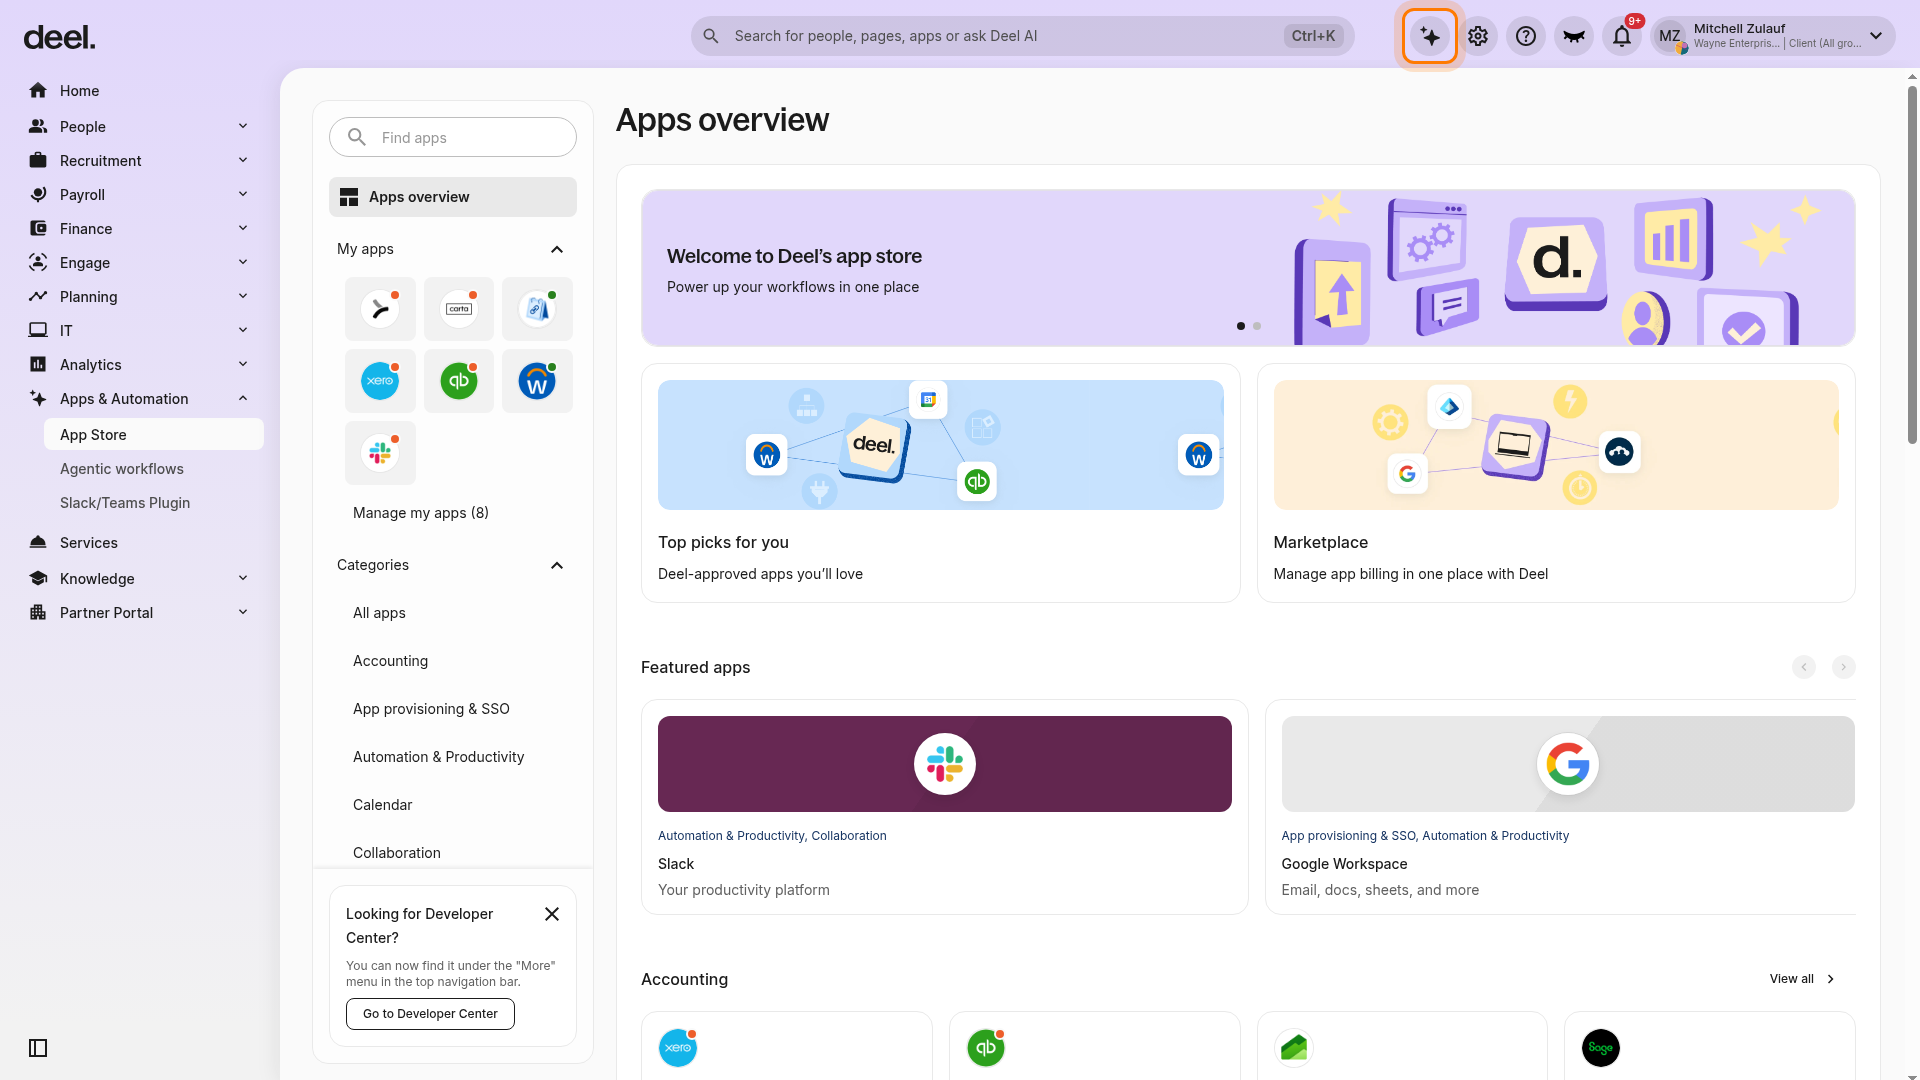
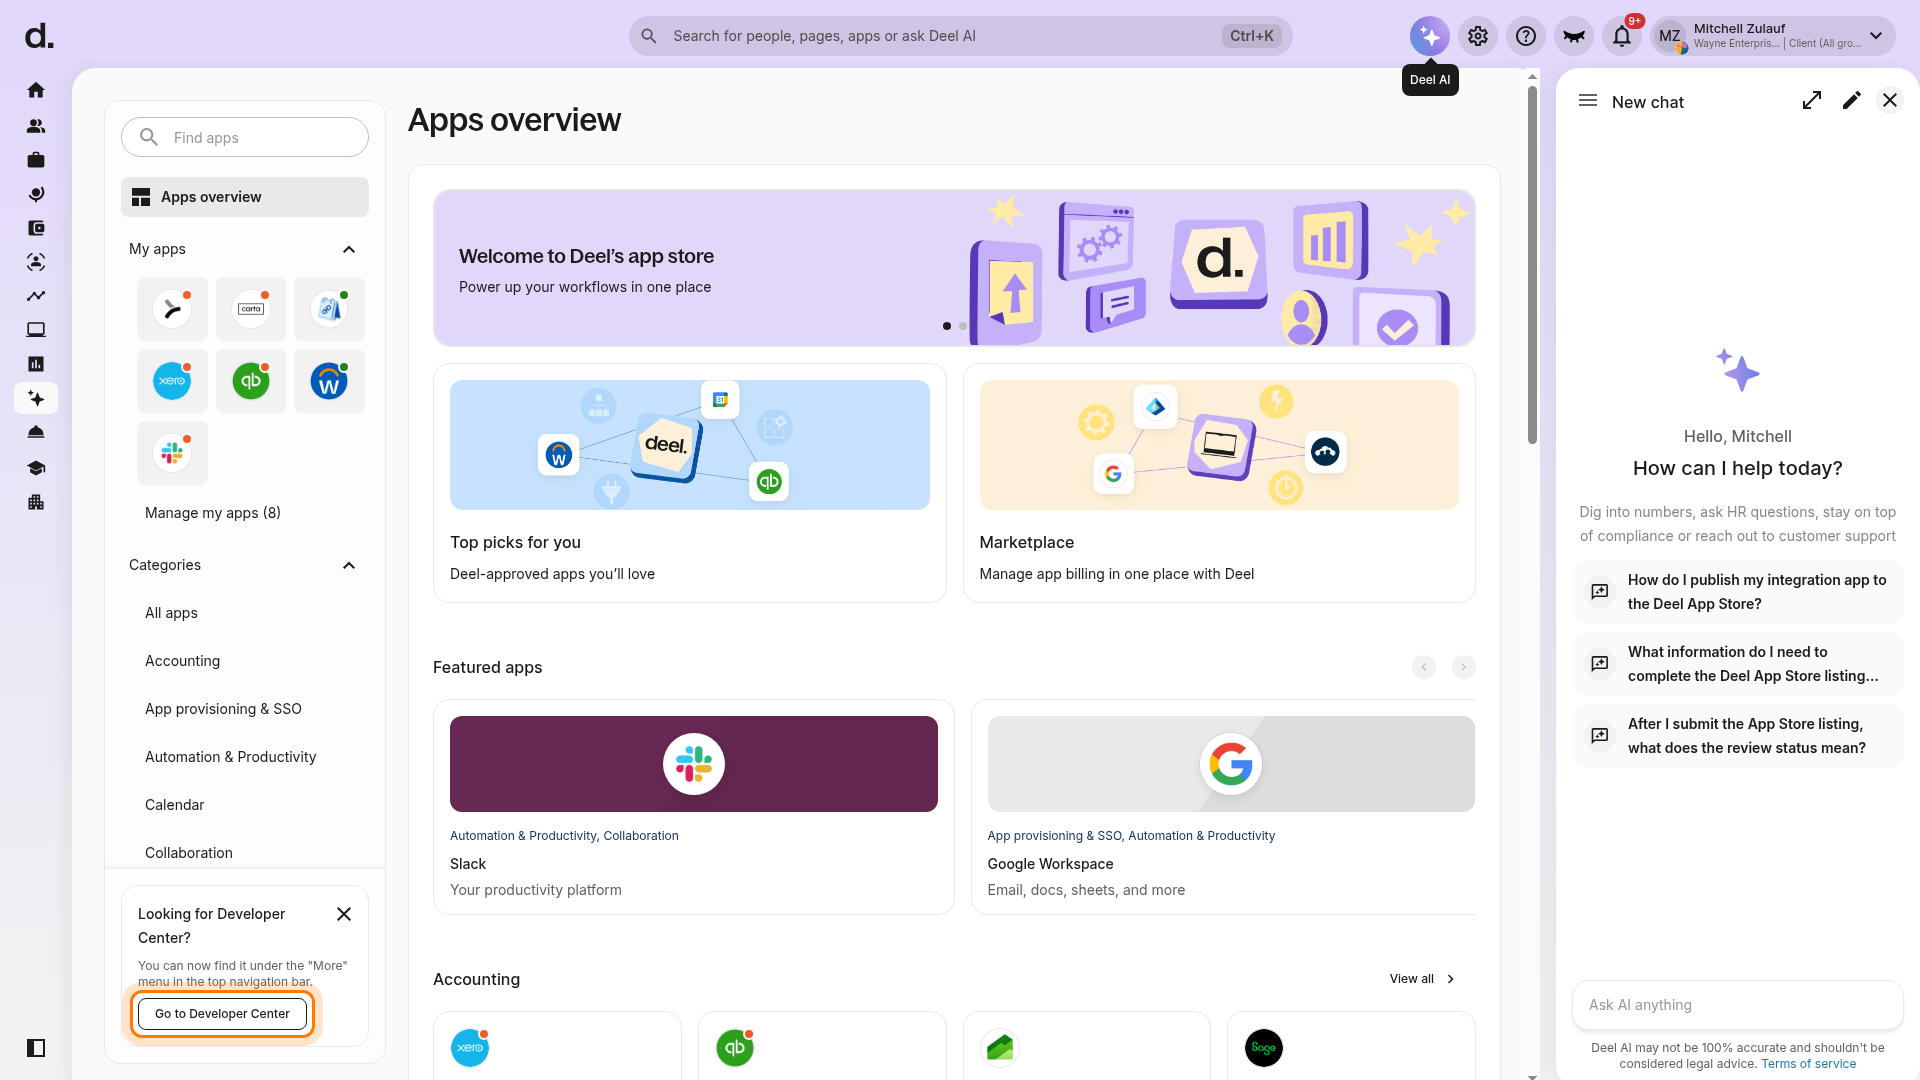
On the Apps overview page, find the Looking for Developer Center? card near the bottom of the left Apps panel.
Select Go to Developer Center.
Do not use the sparkle-shaped top-bar button; it opens the Deel AI panel rather than Developer Center.
Step 5 - Verify the Tokens tab
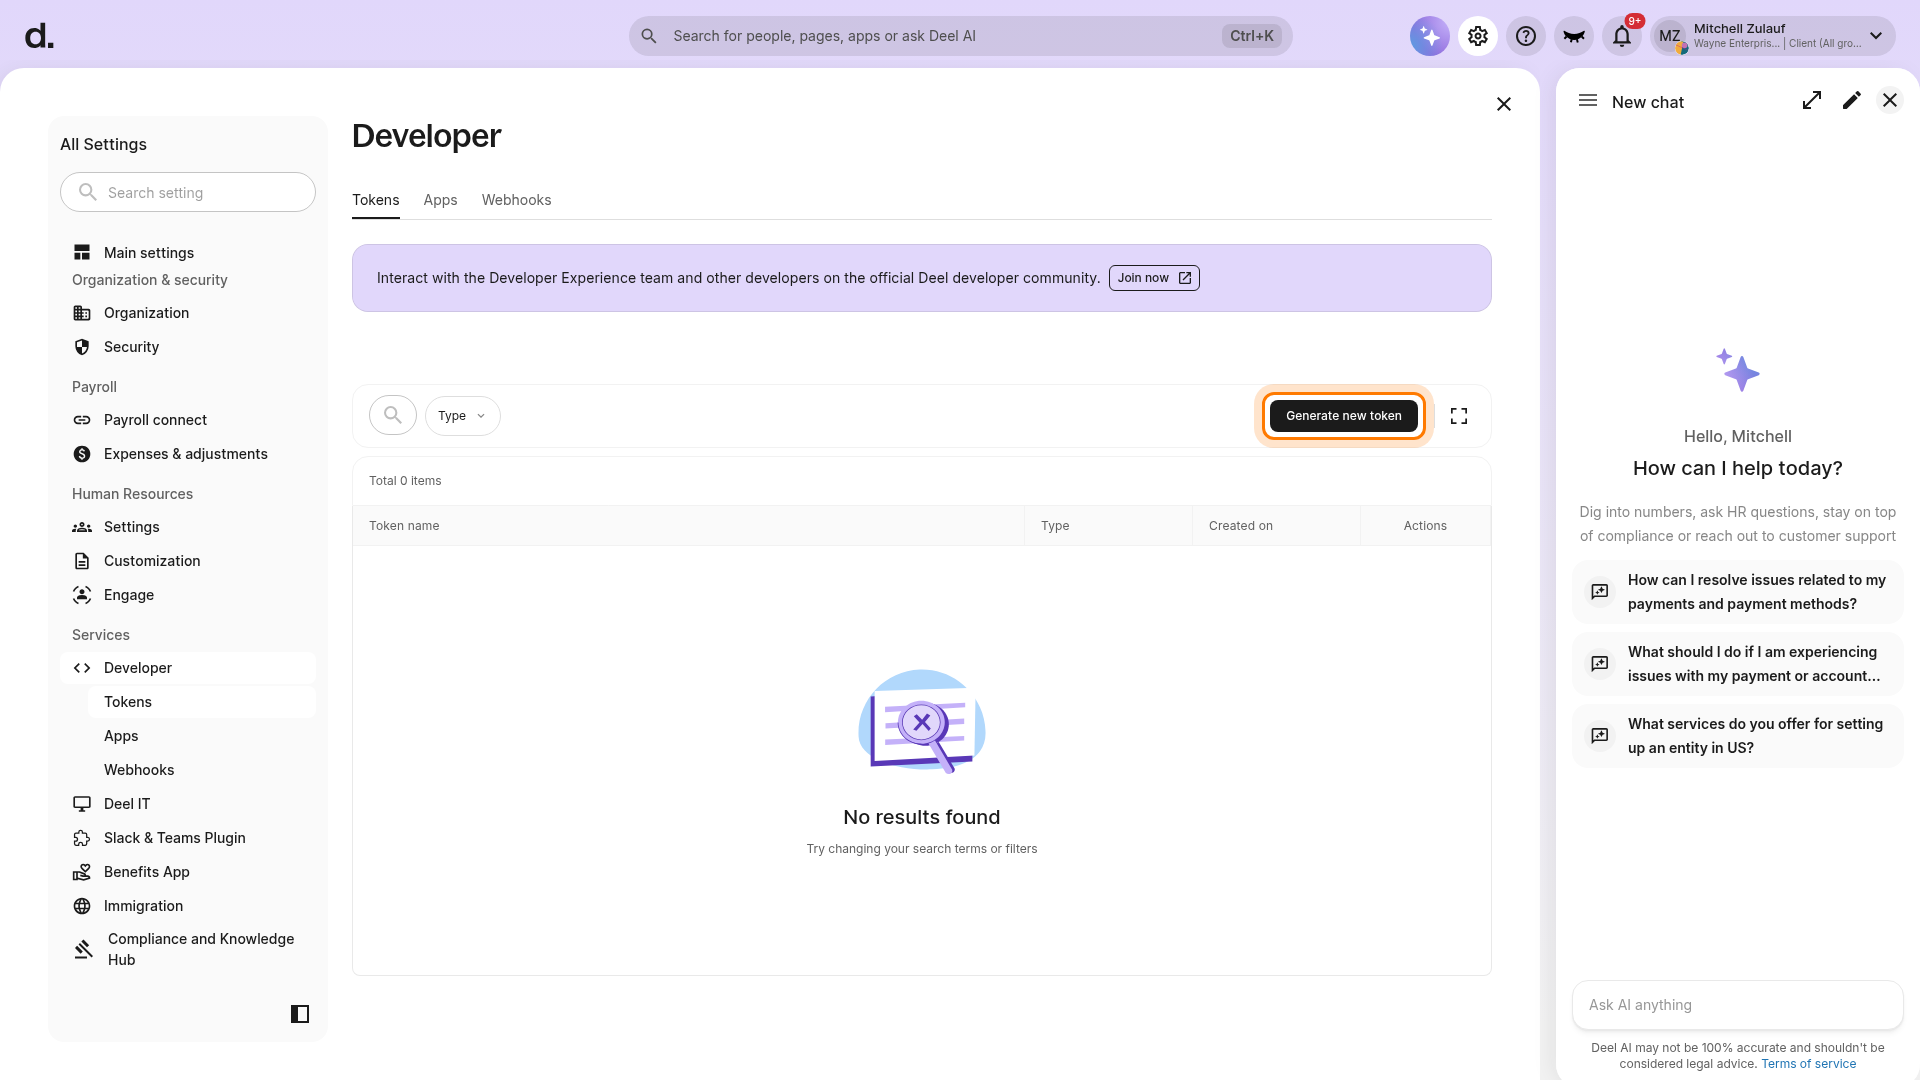
Verify that the Developer page opens and that the Tokens tab is selected.
Older documentation may refer to this area as Access Tokens.
If the page shows No results found, no tokens exist yet. This is expected and does not prevent you from generating a token.
Step 6 - Open the token wizard
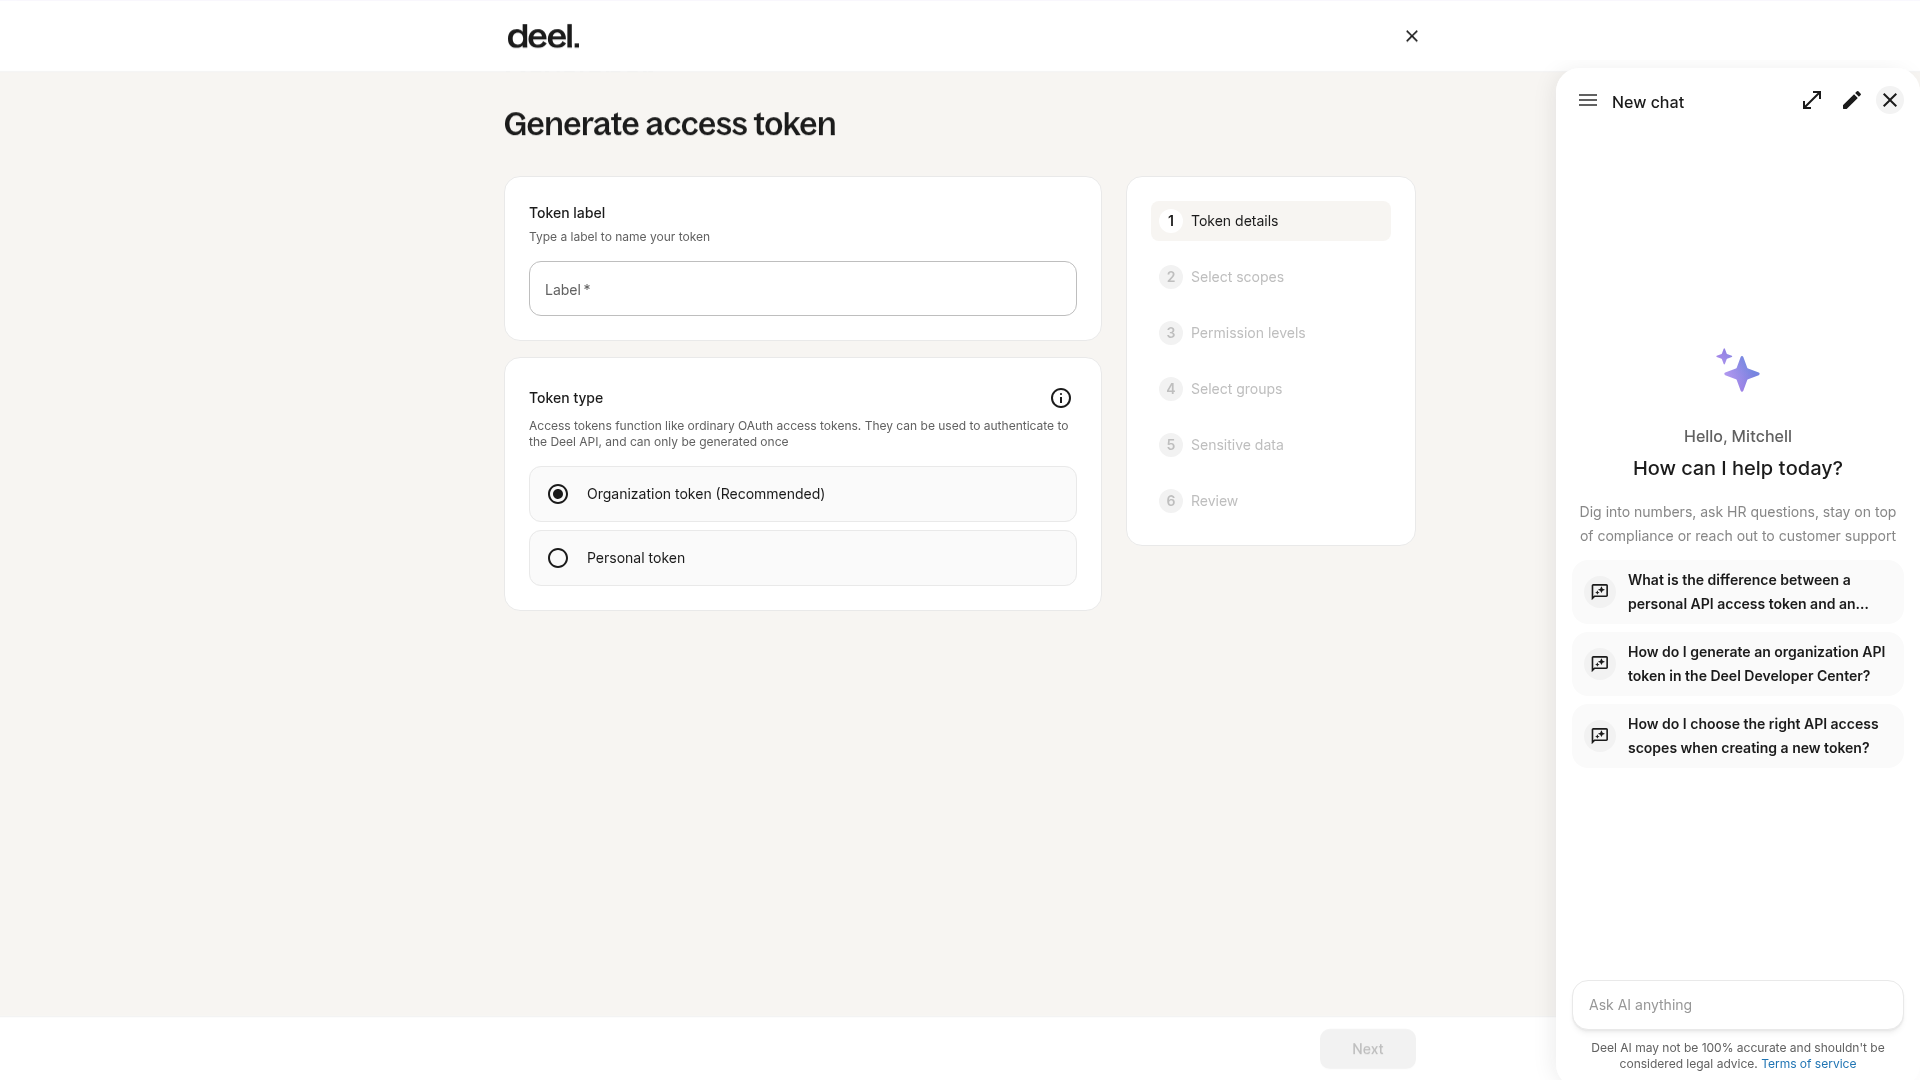
Select Generate new token.
The Generate access token wizard opens at 1 Token details.
The wizard displays a required Label field and token-type options such as Organization token (Recommended) and Personal token.
Step 7 - Complete token generation
Enter a token label, select the appropriate token type, and continue through the wizard to select scopes, permission levels, and groups before reviewing the token.
Choose the correct scopes for the created token in order for Zapier to be able to access the information you want to sync
When token generation is complete, copy the token value and store it securely. The value is shown only once.
Use it in Step 2 - Choose account when setting up your Zap.
Please note that one must be an Organization Manager on Deel to retrieve the API token.
✅ Step 3 - Test trigger
Zapier pulls sample data from Deel to test the event chosen in Step 1.
Review the retrieved data structure to confirm the connection is working seamlessly.
✅ Step 4 - Set up action in your external software
Choose one of Zapier’s 5,400+ applications and define the action that should be performed after the trigger fires.
Select Deel in this step if the action should happen inside Deel.
✅ Step 5 - Publish your Zap
After testing succeeds, select Publish & Turn On to start the automation.
People and Time-off Actions
Deel Zapier integration just got better with expanded capabilities to include essential people and time-off actions. This enhancement is pivotal for automating and streamlining clients' HR and payroll operations. Now, managing employee data and time-off requests is more efficient than ever, saving time and reducing manual efforts.
Features:
-
Create Time-off Entry: Effortlessly create a time-off entry for a worker in Deel, streamlining the leave management process.
-
Find Worker by Email: Quickly locate a worker in Deel using their email address, making employee data management more efficient.
-
Find Worker by ID: Easily find a worker in Deel using their ID, ensuring accurate and swift access to employee information.
Examples
Find some Deel <> Zapier automation examples below.
Please also check our Zapier <> Deel integration page here to match Deel with any favorite tools to see the options available for data exchange.
New contract creation
Deel wants this action to automatically create a new onboarding project in Asana to help hiring groups to prepare the onboarding for new joiners from an Asana template and then keep track of new joiners’ progress during their onboarding time.
Invoice adjustments
An example is where a new invoice adjustment that has been created on Deel will send a Slack message to a channel or specific person.
This can be helpful for the approver to receive notifications proactively instead of constantly checking the platform for new items to approve.
Timesheets
Another example is where a new approved time off event in Timely Time Tracking will create a new timesheet entry in Deel.
This can be helpful for any company that uses an external system to track time and wants to avoid double-keying that information manually into Deel.